In a world where dietary needs are as diverse as our taste buds,gluten-free baking has emerged from niche kitchens to become a beloved art form. But when it comes to sandwich bread-the comforting canvas for everything from hearty lunches to midnight snacks-gluten-free versions have frequently enough felt more like a compromise than a party. Fear not: “The Ultimate Guide to Baking Gluten-Free Sandwich Bread” is here to change that narrative. Weather you’re navigating celiac disease, gluten sensitivity, or simply experimenting with new ingredients, this guide unravels the secrets to creating soft, flavorful, and perfectly textured loaves that hold up to your favorite fillings. Get ready to transform your baking routine and redefine what gluten-free really means-one slice at a time.
Gluten-free flours can feel like an enigmatic puzzle when striving for a light and fluffy sandwich bread, but understanding their unique qualities unlocks the secret to airy perfection.Combining the right blend of flours creates a tender crumb that rivals customary wheat breads, offering both delightful texture and delicious flavor. This guide dives into selecting top gluten-free flours, balancing dough hydration, mastering the rise without gluten’s stretch, and enhancing the bread’s profile with carefully chosen flavors-all tailored to boost your baking confidence.
Prep and Cook Time
- Readiness: 20 minutes
- Rising: 1 hour 30 minutes (divided rises)
- Baking: 35-40 minutes
- Total Time: Approximately 2 hours 30 minutes
Yield
one 9×5-inch loaf, approximately 12 slices
Difficulty Level
Medium – perfect for bakers ready to explore advanced gluten-free techniques
Ingredients
- 1 ½ cups brown rice flour, fine-textured
- 1 cup tapioca starch for elasticity
- ½ cup sorghum flour for mild sweetness and structure
- 2 tsp xanthan gum – essential for dough cohesion
- 1 tbsp instant yeast
- 1 tsp sea salt
- 1 ½ cups warm water (105°F/40°C), adjust as needed*
- 2 tbsp olive oil or avocado oil
- 2 tbsp honey or maple syrup
- 2 large eggs, at room temperature
- 1 tsp apple cider vinegar
instructions
- Prepare the dry ingredients. In a large bowl, whisk together brown rice flour, tapioca starch, sorghum flour, xanthan gum, yeast, and salt to ensure even distribution.
- Combine wet ingredients. In a separate bowl, beat the eggs with warm water, honey, olive oil, and apple cider vinegar until fully mixed and slightly frothy.
- Incorporate wet into dry. Pour the wet mixture slowly into the dry ingredients while stirring with a wooden spoon or spatula. The dough will be more batter-like but sticky-that’s ideal for hydration.
- Beat the dough. Using a stand mixer fitted with a paddle attachment or a hand mixer, beat on medium-high for 3-5 minutes. This step aerates the dough, compensating for the lack of gluten’s structure and improving rise.
- First rise. Scrape the dough into a greased 9×5-inch loaf pan, smoothing the top gently with an oiled spatula. Cover loosely with a damp cloth or plastic wrap and let it rise in a warm spot until it doubles in size, about 1 hour.
- Preheat your oven. Set to 375°F (190°C) about 15 minutes before baking to ensure an even, hot baking environment.
- Bake with steam optional. For an extra light crust, place a shallow pan of boiling water on the oven floor as you put the bread in. Bake for 35-40 minutes until golden brown and a skewer inserted comes out clean.
- Cool fully. Allow the bread to cool in the pan for 10 minutes,then transfer onto a wire rack. Cooling prevents sogginess and firms the crumb.
Tips for Success
- Hydration is key. You might need slightly more or less warm water depending on the freshness of your flours and humidity. The dough should be loose but not pourable.
- Flour swap advice. If you can’t find sorghum flour, millet or oat flour are excellent alternatives that contribute similar texture and flavor.
- Boost your rise. A teaspoon of vital wheat gluten substitute (such as flaxseed meal combined with psyllium husk) can further improve elasticity and crumb structure.
- Make ahead. This bread freezes beautifully; slice before freezing for effortless sandwiches anytime.
- common pitfalls. If the bread turns out to dense, ensure your yeast is fresh and your liquid temperature isn’t too hot, which can kill the yeast. Also, avoid overmixing after adding yeast to prevent loss of rising power.
Serving Suggestions
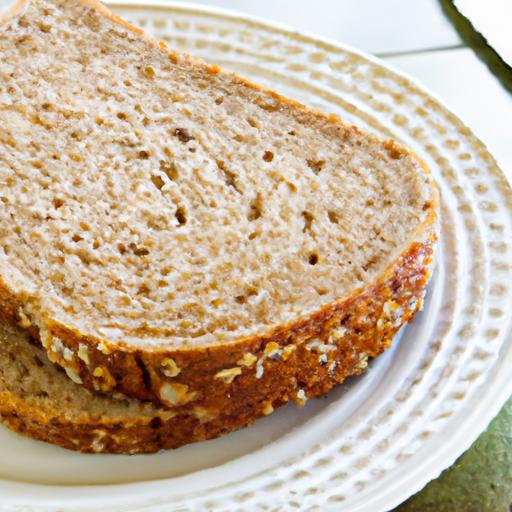
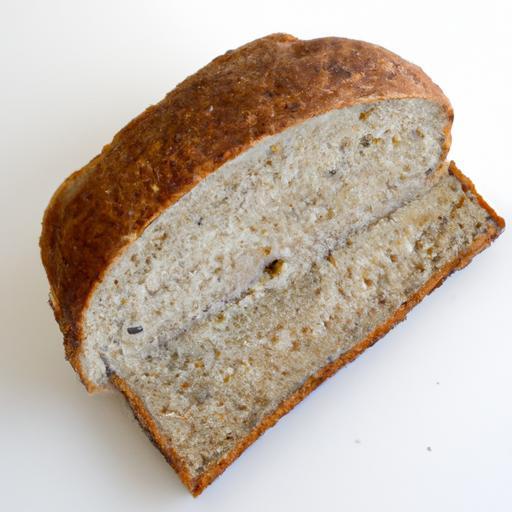
Slice generous pieces to enjoy the fine crumb and slight chew that perfectly supports your favorite sandwich fillings. For a flavor lift, spread with sun-dried tomato pesto or a creamy avocado mash. Fresh herb sprigs or a sprinkle of sesame seeds on top before baking add both visual charm and extra taste. This bread shines with simple deli meats, crisp lettuce, and sharp cheddar for classic sandwiches, or as the perfect base for vegan chickpea salad.
 gluten-free sandwich bread with light and fluffy texture” class=”wp-image-1234″/>
| Nutrient | Per slice (1/12 loaf) |
|---|---|
| Calories | 110 |
| Protein | 3g |
| Carbohydrates | 19g |
| Fat | 3g |
For more in-depth understanding of gluten-free flours,visit The Celiac Disease Foundation’s Flour Guide.Also, explore our collection of gluten-free breakfast breads for complementary ideas.
Q&A
Q&A: The Ultimate guide to Baking Gluten-Free Sandwich Bread
Q1: Why choose gluten-free sandwich bread?
A1: Whether you’re managing celiac disease, gluten sensitivity, or simply exploring a healthier lifestyle, gluten-free sandwich bread offers a delicious option without the gluten. It allows you to enjoy classic sandwiches without compromising on taste or texture.Q2: What’s the biggest challenge in baking gluten-free bread?
A2: Unlike traditional bread, gluten-free bread lacks the stretchy protein network that gives dough structure and chewiness. This means achieving a soft, airy crumb is tricky-without gluten, your bread can easily turn out dense, crumbly, or dry.Q3: How can I replicate the texture of traditional sandwich bread?
A3: The secret lies in the blend of gluten-free flours (like rice, tapioca, or oat flour) combined with binders such as xanthan gum or psyllium husk. These ingredients work together to mimic gluten’s elasticity and hold moisture, giving your bread that familiar softness and spring.
Q4: Which ingredients are essential for a perfect gluten-free sandwich loaf?
A4: Key players include a well-balanced gluten-free flour mix, eggs or egg replacers for structure, a good fat source (like olive oil or butter) for tenderness, and a leavening agent like yeast or baking powder. Don’t forget water or milk alternatives to hydrate the dough just right!
Q5: Are there special techniques to baking gluten-free bread?
A5: Absolutely! Gluten-free doughs often benefit from longer mixing times to hydrate the flours fully. Also, letting the dough rest after mixing allows the binders to activate and improve texture. baking at the right temperature with steam can definitely help create a golden crust and seal in moisture.
Q6: Can I customize flavors in gluten-free sandwich bread?
A6: Definitely! You can infuse your loaf with herbs, garlic, seeds, or even a touch of sweetness with honey or maple syrup. Since gluten-free bread tends to have a milder base flavor, these additions really shine and make every slice exciting.
Q7: How should I store gluten-free sandwich bread to keep it fresh?
A7: Gluten-free bread can dry out quickly, so store it in an airtight container at room temperature for up to two days. For longer storage, slice and freeze the bread. Toast slices straight from the freezer to revive that fresh-baked texture.
Q8: Is gluten-free sandwich bread suitable for all diets?
A8: While gluten-free bread caters to those avoiding gluten, many recipes can be adapted for other dietary needs, such as dairy-free or vegan, by swapping out eggs and dairy ingredients. Always check the labels on your gluten-free flours to ensure they meet your dietary requirements.
Q9: Where can I find reliable gluten-free flour blends?
A9: Specialty grocery stores, health food shops, and online retailers frequently enough offer a variety of gluten-free flour blends. Some brands formulate blends specifically for bread baking, which can save you the effort of mixing your own from scratch.Q10: What’s the ultimate tip for gluten-free bread success?
A10: Patience and experimentation are key. Every gluten-free flour behaves a bit differently, so don’t be afraid to tweak hydration levels, rising times, and baking temperatures. With practice,your gluten-free sandwich bread will be every bit as lovable as the traditional kind-soft,flavorful,and perfect for your favorite fillings.
Final Thoughts
Whether you’re a seasoned baker or just beginning your gluten-free journey, mastering the art of gluten-free sandwich bread opens up a world of delicious possibilities. With the right blend of ingredients, a pinch of patience, and the tips shared in this guide, you’re well on your way to creating soft, flavorful loaves that rise to every sandwich occasion. So preheat your oven, gather your favorite gluten-free flours, and let your kitchen become the birthplace of breads that everyone at the table can enjoy-no compromises needed. Happy baking!