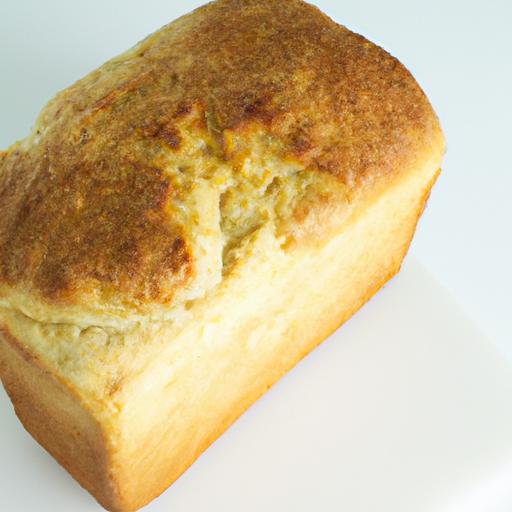
In the world of home baking, few joys compare to the warm, comforting aroma of freshly baked bread wafting through the kitchen. For those embracing a gluten-free lifestyle, however, crafting that perfect loaf can feel like an elusive dream-dense textures and crumbly slices often stand between you and bread bliss. Enter the bread machine: a modern marvel transforming the gluten-free baking experience from a tricky challenge into a delightful adventure. In this article, we reveal our top gluten-free bread machine recipes, designed to turn simple ingredients into irresistibly soft, flavorful loaves that will have everyone reaching for seconds. Whether you’re a seasoned baker or just starting out, get ready to bake easy and gluten-free like never before.
Bake Easy: Top Gluten-Free Bread Machine recipes Revealed brings you the ultimate guide to mastering the art of gluten-free dough. crafting bread that is moist, fluffy, and perfectly textured can feel like an elusive goal-but with the right flours, methods, and expert insights, your bread machine will deliver exceptional results every time. The secret lies in balancing ingredients that support structure without gluten and embracing techniques tailored specifically for these delicate doughs.
Prep and Cook time
- Planning: 15 minutes
- Rising time (in bread machine): 1 hour 30 minutes
- Baking time: 45-60 minutes
- Total time: Approximately 2 hours 30 minutes
Yield
One 1.5-pound loaf (about 12 slices)
Difficulty Level
Easy - perfect for beginners and experienced bakers alike
Ingredients
- 1 cup brown rice flour (finely milled for smooth texture)
- 1/2 cup tapioca starch (for chewiness and crisp crust)
- 1/2 cup potato starch (lightens the crumb)
- 1 tsp xanthan gum (provides necessary elasticity)
- 1 1/2 tsp active dry yeast (ensure freshness for best rise)
- 1/2 tsp salt
- 2 tbsp sugar (feeds the yeast, balances flavors)
- 1 cup warm water (110°F / 43°C, critical for yeast activation)
- 2 tbsp olive oil (adds tenderness and moisture)
- 2 large eggs (room temperature for binding and lift)
Instructions
- Prepare your bread machine: Insert the bread pan and paddle securely. Select the gluten-free cycle for best results if available.
- Activate the yeast: In a small bowl, combine warm water, sugar, and yeast. Stir gently and let bloom for about 5 minutes untill foamy-ensuring a lively rise.
- Mix dry ingredients: In a separate bowl, whisk together brown rice flour, tapioca starch, potato starch, xanthan gum, and salt until evenly combined.
- Add wet ingredients: Beat the eggs lightly and add to the yeast mixture along with olive oil. pour this liquid mix into the bread machine’s pan.
- Layer the dry ingredients: Gently spoon the flour mixture over the wet ingredients in the bread pan,avoiding stirring. This layering helps the yeast activate properly.
- Start the baking cycle: Close the lid and select the gluten-free or basic white bread cycle. Press start and let the bread machine do the work, resisting the urge to open the lid during rising for a consistent loaf.
- check the dough consistency: Within the first 10 minutes,open the lid and use a spatula to scrape any unmixed flour from the sides. The dough should be sticky but moldable-if dry, add water a teaspoon at a time; if wet, dust in a little more rice flour.
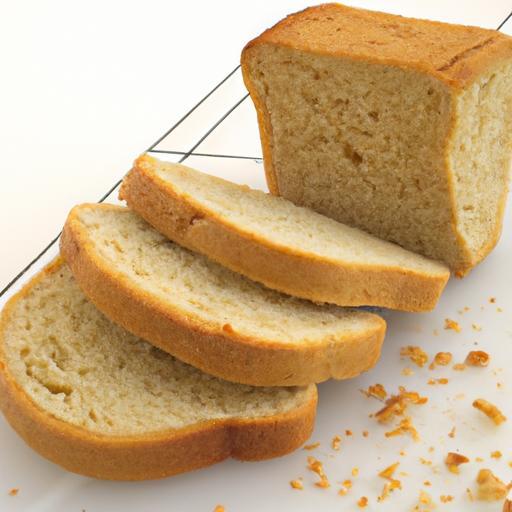
- Cool properly: Once baking is complete, carefully remove the loaf and place on a wire rack to cool for at least 30 minutes before slicing. this resting time helps the crumb set, preventing gummy texture.
Chef’s Notes: Tips for Success with Gluten-Free Bread Machine Baking
- Flour blends matter: Don’t rely on a single gluten-free flour. Combining brown rice flour, tapioca starch, and potato starch creates a balanced texture reminiscent of traditional bread.
- Xanthan gum’s magic: This provides the elasticity your dough needs to trap gas bubbles and rise well. Avoid omitting or subbing without a similar binder.
- Water temperature: Too hot or too cold water kills yeast activity. Always aim for around 110°F to wake your yeast gently.
- Customize your flavors: try stirring in dried herbs like rosemary or garlic powder for savory loaves, or add a tablespoon of honey for a touch of sweetness.
- Store right: Wrap cooled bread tightly and freeze in airtight bags. Toast slices from frozen for fresh-baked warmth any time.
Serving suggestions
Your freshly baked gluten-free loaf shines best simply toasted with a swipe of creamy butter or your favorite nut butter. For a gourmet twist, present slices topped with avocado mash, a sprinkle of chili flakes, and microgreens. Pair alongside homemade soups or vibrant salads for balanced meals that celebrate wholesome comfort and flavor.
For an indulgent breakfast, serve toasted slices drizzled with local honey and fresh berries-each bite perfectly moist and light, defying the common misconceptions of gluten-free bread.

| Nutrition per Slice | Calories | Protein (g) | Carbs (g) | Fat (g) |
|---|---|---|---|---|
| 1 slice (approx. 50g) | 120 | 3 | 22 | 3 |
| 100g serving | 240 | 6 | 44 | 6 |
For more creative gluten-free baking ideas, check out our Gluten-free Desserts Collection-a treasure trove of tasty recipes that complement every meal. For deep scientific insights on gluten-free baking science, The Celiac Disease Foundation is an invaluable resource.
Q&A
Q&A: Bake Easy – Top Gluten-Free Bread Machine Recipes Revealed
Q1: Why choose a bread machine for baking gluten-free bread?
A1: baking gluten-free bread can be tricky due to the absence of gluten’s elastic texture, but a bread machine takes much of the guesswork out. It controls timing, kneading, and baking temperature precisely, ensuring your loaf rises beautifully and has a perfect crumb-without the oven’s unpredictability.
Q2: What are the key ingredients for accomplished gluten-free bread in a machine?
A2: Successful gluten-free bread relies on a blend of flours such as rice flour, tapioca starch, and sometimes almond or sorghum flour. Xanthan gum or psyllium husk often shows up as a binder to replace gluten’s stretchy magic. Fresh yeast, the right amount of liquid, and a pinch of sugar to activate fermentation are crucial to getting a nice rise.
Q3: Can I use regular bread recipes in my gluten-free machine baking?
A3: Not quite. Gluten-free baking demands a specific flour mix and often different liquid ratios. Regular bread recipes typically won’t produce good results without adjustments,since gluten-free doughs behave differently-often wetter and stickier-and need unique handling.Q4: What are some top gluten-free flour blends for bread machines?
A4: A popular blend might include: 2 parts brown rice flour, 1 part tapioca starch, and 1 part potato starch. Adding a tablespoon of psyllium husk powder can improve texture. Experimenting with millet or sorghum flours also adds unique flavor and nutritional value.
Q5: Which gluten-free bread machine recipes stand out?
A5: Try a classic gluten-free sandwich loaf with a blend of rice flour and tapioca starch for versatile slices perfect for toast or sandwiches. Another crowd-pleaser: sweet cinnamon-glucose raisin bread, ideal for breakfast or an afternoon pick-me-up. For something hearty, a multi-seed gluten-free bread loaded with sunflower, flax, and pumpkin seeds adds crunch and nutrition.
Q6: How do you prevent gluten-free bread from drying out?
A6: Gluten-free bread can dry quickly-so adding ingredients like applesauce, yogurt, or olive oil helps retain moisture. Also, storing it in an airtight container or slicing and freezing it shortly after baking preserves freshness longer.
Q7: Any tips to ensure the best rise and texture?
A7: Make sure your yeast is fresh and active. Use warm-not hot-water to wake it up. Give your bread machine a gluten-free cycle if available, and be patient; gluten-free bread often benefits from longer rising times. Don’t skip the binder (xanthan gum or psyllium), as it’s crucial for structure.
Q8: Can I customize flavors in gluten-free bread machine recipes?
A8: Absolutely! Once you master the basic formula,experiment with herbs like rosemary or thyme,swap some flours for nutty alternatives,or add mix-ins like olives,nuts,or dried fruit for personalized loaves that suit your taste buds.
Q9: Were can beginners find reliable gluten-free bread machine recipes to get started?
A9: There are fantastic cookbooks dedicated to gluten-free bread machine baking, as well as food blogs and dedicated recipe sites. Look for recipes with clear instructions on flour blends and rising times. Many bread machine manuals also provide gluten-free recipes designed specifically for their models.
Q10: What’s the biggest secret to baking perfect gluten-free bread in a machine?
A10: Patience and precision. Measuring ingredients carefully, following a trusted recipe, and allowing the bread machine to do its magic will reward you with soft, fluffy, and delicious gluten-free bread every time. Plus, don’t be afraid to tweak ratios or try new add-ins as you become a gluten-free baking pro!
The Conclusion
Baking gluten-free bread doesn’t have to be a daunting task reserved for the brave or the patient. With the right recipes and your trusty bread machine by your side, you can transform simple ingredients into warm, comforting loaves that rival any traditional bread. Whether you’re catering to dietary needs or simply exploring new flavors, these top gluten-free bread machine recipes unlock a world of delicious possibilities. So dust off your machine, gather your favorite ingredients, and embark on a baking journey that’s as effortless as it is satisfying.After all, the best bread is the one baked with ease-and enjoyed fresh from your own kitchen.