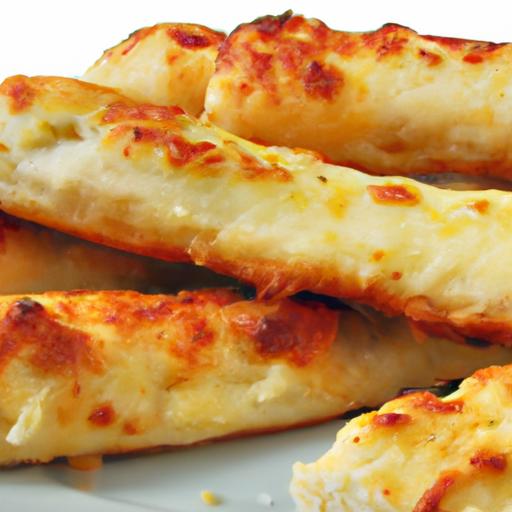
There’s something universally enchanting about the pull of molten,gooey cheese stretching from a freshly baked breadstick-an irresistible dance of flavors and textures that has captured taste buds around the world. welcome to Melty Cheese Magic: The ultimate Guide to Cheesy Breadsticks, where we dive deep into the art and science behind this beloved snack. From selecting the perfect cheeses that ooze just right to mastering the golden, crispy crust that cradles every savory bite, this guide will transform your kitchen into a haven of cheesy delight. Whether you’re a seasoned baker or a curious foodie, prepare to unlock secrets, techniques, and creative twists that celebrate the simple joy of cheesy breadsticks in all their melty, magical glory.
Melty Cheese Magic: Choosing the Perfect Cheese Blend for Irresistible Flavour and Stretch
Melty cheese magic begins with the perfect cheese blend that unlocks that ooey-gooey stretch and unforgettable flavor in every bite of your homemade cheesy breadsticks. The secret lies in balancing creaminess, meltability, and a hint of tang for depth-qualities found in cheeses that complement and elevate each other rather than compete. Whether you prefer the silky stretch of mozzarella or the sharp bite of aged cheddar,mastering your cheese choices sets the stage for an unforgettable cheese pull that’s as delightful to behold as it is indeed to savor.
Prep and Cook Time
- Preparation: 20 minutes
- Proofing dough: 1 hour
- Baking: 15 minutes
- Total Time: Approximately 1 hour 35 minutes
Yield
Serves 6-8 hungry breadstick lovers
Difficulty Level
Medium – Perfect for eager home bakers ready to impress with their melty cheese magic
Ingredients
- 2 ½ cups all-purpose flour, sifted
- 1 cup warm water (110°F/43°C)
- 2 ¼ tsp active dry yeast (one packet)
- 1 tsp sugar
- 1 tsp fine sea salt
- 2 tbsp olive oil, plus extra for brushing
- 1 cup shredded whole milk mozzarella cheese
- ½ cup shredded sharp white cheddar cheese
- ½ cup shredded provolone cheese
- 1 tsp garlic powder
- 1 tbsp freshly chopped parsley (for garnish)
- Coarse sea salt for finishing
Instructions
- activate the yeast: In a small bowl, combine warm water, sugar, and yeast. Let it sit 5-7 minutes until foamy and fragrant. This indicates the yeast is alive and primed for action.
- Make the dough: In a large mixing bowl, whisk sifted flour and sea salt. Pour in the yeast mixture and olive oil. Stir gently with a wooden spoon until a rough dough forms.
- Knead to perfection: Turn dough onto a floured surface and knead for 8-10 minutes until smooth, supple, and slightly tacky but not sticky. Use brief rests if dough resists stretching.
- First proof: Lightly oil a clean bowl, place the dough ball inside, cover tightly with plastic wrap, and let rise in a warm spot for 1 hour or until doubled in size.
- Shape the breadsticks: Punch down the dough gently and transfer it to a baking sheet lined with parchment.Roll dough into a rectangle about ½-inch thick. Sprinkle garlic powder evenly over the surface.
- Add the cheese layer: Sprinkle a uniform layer of shredded mozzarella, followed by cheddar and provolone, covering the dough but leaving a ½-inch border.
- Roll and cut: Starting at the long edge, tightly roll the dough into a log. Using a sharp knife or pizza cutter, slice into 1-inch thick rounds and place cut side down, spaced evenly apart, onto the baking sheet.
- Second proof: Cover loosely with a kitchen towel and let rise 20 minutes to puff slightly, ensuring soft, chewy interiors.
- Brush and season: Gently brush olive oil over each breadstick and sprinkle with coarse sea salt for a flush of flavor and golden crust.
- Bake to golden perfection: preheat the oven to 400°F (205°C). Bake breadsticks for 12-15 minutes, or until they puff and the cheese melts into a bubbling, golden masterpiece.
- Garnish and serve: Remove from oven and instantly sprinkle with fresh parsley for a luminous, herby accent. Serve warm with your favorite dipping sauces.
Tips for Success
- Cheese selection matters: For outstanding melt and stretch, whole milk mozzarella provides essential creaminess, while provolone adds subtle nuttiness and cheddar cuts through with sharpness and depth.
- Don’t skip yeast activation: Using water that’s too hot kills the yeast; too cold slows rise-aim for a cozy 110°F. Watch for the foaming to confirm readiness.
- Gluten growth is key: Proper kneading and resting ensures breadsticks rise with soft chewiness,gripping melted cheese perfectly.
- Brush thoughtfully: A gentle olive oil coating helps the crust crisp without drying out the dough, while coarse salt delivers irresistible crunch and savor.
- Make ahead: Prepare dough and shape breadsticks up to the second proof, cover tightly, and refrigerate overnight for enhanced flavor. Bake fresh the next day.
Serving Suggestions
Present your melty cheese magic on a rustic wooden board garnished with sprigs of fresh rosemary or thyme for an herbaceous note. Pair these breadsticks with inventive dipping sauces that awaken the senses-try a smoky chipotle marinara, a creamy roasted garlic aioli, or a zesty pesto cream dip for a flavor experience that’s both comforting and exciting. A side of crisp mixed greens lightly dressed with lemon vinaigrette balances the richness beautifully. For an indulgent twist, sprinkle warm breadsticks with a dusting of grated Parmesan and a light drizzle of truffle oil.

| Nutrient | Per Serving |
|---|---|
| Calories | 280 kcal |
| Protein | 12 g |
| Carbohydrates | 30 g |
| Fat | 12 g |
Craving more tasty bread recipes? Check out our Ultimate Garlic Knots Recipe for another crowd-pleaser. For expert insights on the science of cheese melting, visit the Craft Logic Science Lab.
Q&A
Q&A: Melty Cheese Magic – The Ultimate Guide to Cheesy Breadsticks
Q1: What makes cheesy breadsticks so irresistibly magical?
A1: It’s all about the gooey, molten cheese melded with warm, fluffy bread. The magic lies in the perfect balance between the crispy golden crust and that stretchy, melty core, creating a sensory symphony that beckons you to indulge bite after bite.
Q2: Which types of cheese work best for cheesy breadsticks?
A2: Mozzarella is king for its signature stretch and mild creaminess, but blending it with sharp cheddar, tangy provolone, or even a sprinkle of parmesan adds layers of flavor complexity. Experimenting with different cheeses is like casting your own cheesy spell!
Q3: How do I achieve that perfectly stretchy cheese pull?
A3: Start with fresh, high-moisture mozzarella and bake the breadsticks at a high temperature (around 425°F/220°C) to quickly melt the cheese without drying it out. Also, layering cheese under and on top of the dough helps keep it gooey and luscious.
Q4: Can I make cheesy breadsticks without a fancy oven or special tools?
A4: Absolutely! A conventional oven works great, and even a cast-iron skillet on the stovetop can do the trick. The key is consistent heat and fresh dough-store-bought pizza dough is a convenient shortcut that still yields delicious results.
Q5: What’s the best way to spice up classic cheesy breadsticks?
A5: Add herbs like garlic, rosemary, or oregano into the dough or sprinkle on top before baking. For a bold finish, a brush of garlic butter or a dash of chili flakes post-bake can bring a magical kick that transforms the ordinary into unusual.
Q6: How should cheesy breadsticks be served for maximum enjoyment?
A6: serve them hot, fresh out of the oven alongside dipping sauces such as marinara, ranch, or a zesty pesto. Pairing with a crisp salad or a bowl of soup elevates the experience,making it feel like a cozy,indulgent feast.
Q7: Are cheesy breadsticks a good option for gatherings or parties?
A7: definitely! Their shareable size and crowd-pleasing flavor make them party-perfect. Plus, they’re flexible-customize cheese blends and add-ins to suit your guests’ tastes, and watch your cheesy creations disappear in minutes.
Q8: Any tips for storing and reheating cheesy breadsticks?
A8: Store leftovers in an airtight container in the fridge for up to 2 days. Reheat in a warm oven (about 350°F/175°C) for 8-10 minutes to revive that crisp crust and melty cheese magic.Microwave reheating can be faster but might leave the bread a bit soggy.
Dive into the world of cheesy breadsticks and discover how simple ingredients can create a little edible enchantment-melty, savory, and utterly irresistible every time!
In Conclusion
As the last stretch of gooey, golden cheese melts into the warm, yeasty breadstick, it’s clear that cheesy breadsticks are more than just a snack-they’re a party of comfort and creativity in every bite. Whether you’re a seasoned baker or a curious kitchen novice, this ultimate guide has armed you with the know-how to craft melty, savory magic right at home. So next time hunger strikes, remember: with a bit of dough, a sprinkle of cheese, and a pinch of passion, you can transform simple ingredients into an irresistible feast of cheesy breadstick perfection. Dive in, get melty, and let the magic unfold!