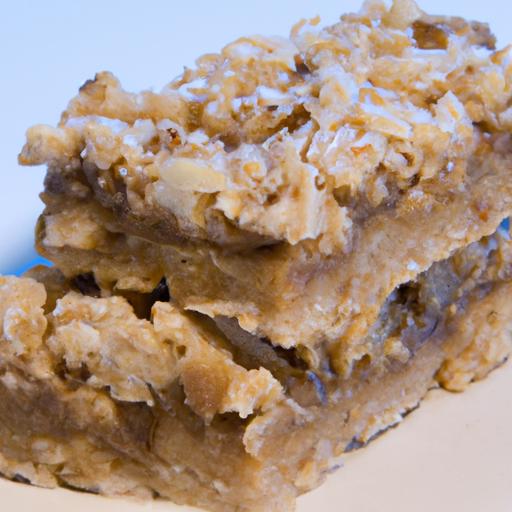
There’s something undeniably magical about biting into a warm,gooey treat that feels both nostalgic and indulgent-and homemade Bear paws Bars deliver just that in every chewy,chocolate-studded bite. These irresistible bars combine the beloved flavors of classic Bear Paws pastries with the cozy satisfaction of a DIY kitchen creation,transforming simple ingredients into a sweet masterpiece you can share with family and friends.Whether you’re an experienced baker or a curious novice, this guide will walk you through crafting these delectable bars that capture the essence of a timeless snack, elevating your dessert game with ease and delight. Get ready to roll up your sleeves and discover the joy of making your own homemade bear Paws Bars-your new favorite treat awaits!
Irresistible homemade bear paws bars are a delightful fusion of buttery, fluffy dough paired with sweet, often fruity fillings that remind us of cozy bakery mornings and childhood treats. As a culinary enthusiast, I’ve perfected the art of creating dough so soft it practically melts in your mouth, while maintaining just enough structure to cradle generous fillings. These bars balance tenderness and flavor, bringing an irresistible charm to your kitchen.
Prep and Cook Time
- Readiness: 25 minutes
- Proofing: 1 hour 15 minutes
- Baking: 18-22 minutes
- Total Time: Approximately 2 hours
Yield
Yields 12 scrumptious bear paws bars, perfect for sharing-or savoring all to yourself.
Difficulty Level
Medium: Requires some dough handling and shaping skills but rewarding for any home baker.
Ingredients
- 3 ½ cups all-purpose flour, sifted
- 1 packet (2 1/4 tsp) active dry yeast
- 1 cup whole milk, warm (110°F/43°C)
- ½ cup granulated sugar
- ⅓ cup unsalted butter, melted and cooled
- 1 large egg, room temperature
- 1 tsp pure vanilla extract
- ½ tsp salt
- ½ cup fruit preserves or sweetened cream cheese filling (your choice)
- Optional: sliced almonds or pearl sugar for topping
Instructions
- Activate the yeast: In a small bowl, combine the warm milk and sugar. Sprinkle the yeast over the top and let it sit for 5-7 minutes until frothy and bubbling,indicating it’s alive and active.
- Mix the dough: In a large mixing bowl, whisk together the flour and salt. Make a well in the center and pour in the yeast mixture, melted butter, beaten egg, and vanilla extract. Stir with a wooden spoon until a rough dough forms.
- Knead until smooth: Turn the dough onto a lightly floured surface and knead for 8-10 minutes until it becomes elastic and soft but not sticky. Tip: Add small amounts of flour if the dough feels too wet; too much flour will make it dense.
- First proof: Lightly oil a clean bowl and place the dough inside, turning once to coat.Cover with a damp cloth and let rise in a warm spot for about 1 hour, or until doubled in size.
- Shape the bars: Punch down the risen dough gently and roll it into a 12×16-inch rectangle on a floured surface. Cut into 12 equal rectangles.
- Add filling: Spoon about 1 tablespoon of your chosen filling down the center of each rectangle. Fold the sides over, slightly overlapping, and pinch closed to seal. Shape each piece into a “paw” by making 3 to 4 small diagonal cuts on one side to resemble bear claws.
- second proof: Place the shaped bars on a parchment-lined baking sheet, cover loosely, and let rise for another 20-30 minutes until puffy.
- preheat the oven: Heat to 350°F (175°C) while the dough is rising.
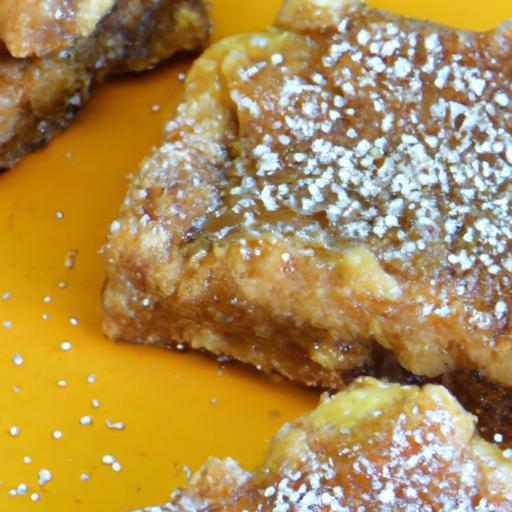
- bake: Brush the tops with a little milk or beaten egg for a glossy finish. Optionally sprinkle sliced almonds or pearl sugar. Bake for 18-22 minutes, or until golden brown and cooked through. Rotate the tray halfway for even baking.
- Cool and serve: Let the bars cool 10 minutes on the tray before transferring to a wire rack. Serve warm or at room temperature.
Tips for success
- Ambient temperature: Yeast rises best in a warm, draft-free area. If your kitchen is cold, pre-warm your oven to 150°F, turn it off, then place the dough inside to proof.
- Filling choices: Experiment with raspberry jam, apricot preserves, or a cinnamon-sugar cream cheese blend to personalize your bear paws bars.
- Dough texture: The dough should be soft but manageable. if too sticky, dust lightly with flour but avoid excessive addition to keep it fluffy.
- Make-ahead: Shape your bars and refrigerate overnight; bake fresh the next day.just extend baking time by a few minutes.
- Storage: Store leftovers airtight at room temperature for up to 2 days or freeze for longer keeping. Reheat gently in a warm oven for freshness.
Serving Suggestions
Present your bear paws bars on a rustic wooden board adorned with fresh berries or a dusting of powdered sugar. These treats pair beautifully with a cup of rich coffee or spiced chai. For an elegant touch,drizzle with warm honey or melted dark chocolate before serving. they also make a charming addition to breakfast trays or afternoon tea spreads-inviting both kids and adults to indulge in their sweet,tender allure.
| nutrient | Per Serving (1 bar) |
|---|---|
| Calories | 220 kcal |
| Protein | 5 g |
| Carbohydrates | 32 g |
| fat | 7 g |
Explore more Danish-inspired pastries to complement your baking adventures.
For deeper insights into yeast handling and dough chemistry, see this King arthur Baking guide.

Q&A
Q&A: Irresistible Homemade Bear Paws Bars – A Sweet DIY Treat
Q1: What exactly are Bear Paws Bars?
A1: Bear Paws Bars are decadent, chewy dessert bars inspired by the classic Bear Paws pastries. They combine layers of buttery dough,gooey caramel,crunchy nuts,and a dusting of cinnamon,creating a mouthwatering treat that’s perfect for any sweet tooth craving.
Q2: Why make Bear Paws Bars at home instead of buying them?
A2: Homemade Bear Paws Bars offer the unbeatable charm of fresh-baked goodness-no preservatives, no mystery ingredients, just pure, customizable delight. Plus,crafting them yourself means you can tailor the flavors with your favorite nuts,add a dash of cinnamon spice,or drizzle extra caramel as you please!
Q3: Are Bear Paws Bars tough to make for beginners?
A3: Not at all! While they may sound fancy,Bear Paws Bars have a straightforward recipe that even baking novices can master. With simple ingredients and step-by-step guidance, these bars come together quickly and beautifully.
Q4: What ingredients do I need to make Bear Paws Bars?
A4: Basic pantry staples like flour, butter, brown sugar, and eggs form the base. Then, you’ll need some caramel (homemade or store-bought), a mix of chopped nuts like walnuts or pecans, cinnamon for warmth, and a pinch of vanilla to elevate the flavor.
Q5: Can Bear Paws Bars be customized?
A5: Absolutely! Switch up the nuts to almonds or hazelnuts, sprinkle in chocolate chips for extra indulgence, or add a layer of jam for a fruity twist.these bars are a canvas of creativity.
Q6: How do I store Bear Paws Bars to keep them fresh?
A6: Keep them airtight at room temperature for up to 3 days, or pop them in the refrigerator if you want them to last about a week. For longer storage, they freeze beautifully-just wrap them tightly and thaw gently before serving.
Q7: What’s the best way to serve Bear Paws Bars?
A7: Serve warm with a scoop of vanilla ice cream for an irresistible dessert, or enjoy them as a snack with your morning coffee or afternoon tea. Their gooey layers and nutty crunch shine in every bite!
Q8: Can I involve kids in making Bear Paws Bars?
A8: Definitely! This recipe is fun and safe for little helpers who can mix, layer, and sprinkle ingredients. It’s a wonderful activity to share, creating sweet memories alongside sweet treats.
Q9: what makes Bear Paws Bars “irresistible”?
A9: It’s the perfect harmony of texture and flavor-the tender crumbly base,luscious caramel,crunchy nuts,and just the right hint of cinnamon. Each bite melts in your mouth and leaves you reaching for more.
Q10: Where did the inspiration for Bear paws Bars come from?
A10: Inspired by the beloved Bear paws pastries often found in bakeries, these bars capture that nostalgic flavor and transform it into an easy-to-make, shareable dessert that brings a cozy homemade vibe to your kitchen.
To Conclude
Whether you’re a seasoned baker or a curious kitchen adventurer, these irresistible homemade Bear Paws Bars offer a delightful blend of comforting flavors and satisfying textures that are sure to charm your taste buds. With simple ingredients and a straightforward process, crafting this sweet DIY treat becomes more than just baking-it’s an experience filled with warmth and creativity. So next time you crave something both nostalgic and new, remember that the perfect bear paw is just a recipe away, ready to bring a little homemade happiness to your day.