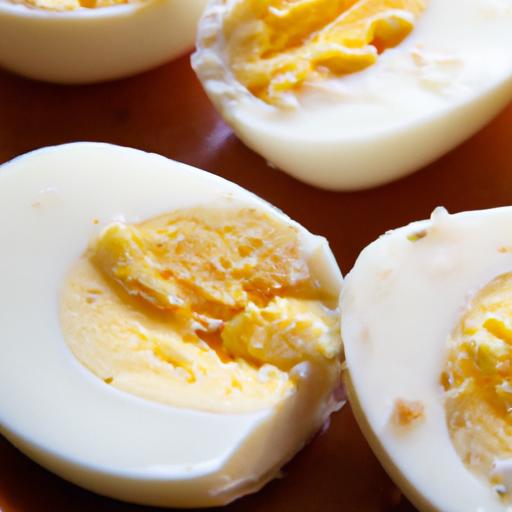
There’s something deceptively simple about the humble hard-boiled egg-a kitchen staple that, when done right, boasts a perfectly firm white surrounding a creamy, vibrant yolk. Yet, achieving that flawless texture every single time can feel like an elusive culinary feat. Behind this everyday marvel lies a blend of science and artistry: a delicate dance of temperature, timing, and technique that transforms a raw egg into a masterpiece of texture and flavor. In this article, we’ll crack open the secrets to mastering the perfect hard-boiled egg, exploring the chemistry behind coagulation, the subtle tricks professionals swear by, and how you can elevate this basic ingredient into a refined component of your meals. Whether you’re an eager beginner or a seasoned cook aiming for consistency, prepare to unlock the egg-cellence of hard-boiled eggs every time you boil.
The Science and Art of Perfect Hard-Boiled Eggs Every Time
The Science and Art of Perfect Hard-Boiled Eggs Every Time starts with a fascination for one of the simplest, yet most nuanced foods in the kitchen: the humble egg. Rooted in centuries of culinary tradition and modern food science,mastering hard-boiled eggs is about more than just boiling water and cracking shells. It requires an understanding of egg anatomy, temperature control, and timing to unlock the ideal texture – creamy yolks surrounded by smooth, tender whites that peel effortlessly. Whether you’re preparing a quick protein-packed snack or aiming to impress with a visually stunning egg salad, these insights will transform your approach and elevate your results.
Prep and Cook Time
- Preparation: 5 minutes
- Cooking: 10-12 minutes
- Cooling and Peeling: 10 minutes
- Total: Approximately 25-30 minutes
Yield
Perfectly cooked hard-boiled eggs for 4 servings (8 eggs)
Difficulty Level
Easy - A beginner-pleasant technique refined with scientific precision.
Ingredients
- 8 large whole eggs, preferably older for easier peeling
- Water – enough to cover eggs in the pot by about 1 inch
- Ice, for an ice bath
- Optional: 1 tsp baking soda or vinegar (to aid peeling)
Instructions for The Science and Art of Perfect Hard-Boiled Eggs Every time
- Bring eggs to room temperature. This step prevents cracking and ensures even cooking.
- Place eggs in a single layer at the bottom of a saucepan. Add cold water until eggs are submerged by about 1 inch.
- Optionally add baking soda or vinegar to help loosen the pectin holding the membrane to the shell, easing peeling later.
- Heat over medium-high heat and bring water to a gentle rolling boil - watch closely to avoid over-boiling.
- Once boiling, reduce heat to maintain a gentle simmer. Start timing instantly:
- 10-11 minutes for fully set but tender yolks
- 12 minutes for firmer yolks
Tips for Success: Understanding Egg Anatomy and Timing
- Egg age matters: Slightly older eggs (7-10 days) peel more easily becuase their inner membrane separates from the shell naturally over time due to pH changes in the white.
- Temperature control is key: The ideal temperature inside the pot should hover around 185°F-200°F for tender whites without rubberiness.
- Timing precision: Overshooting cooking time leads to chalky yolks and tough whites – the hallmark of overcooked eggs.
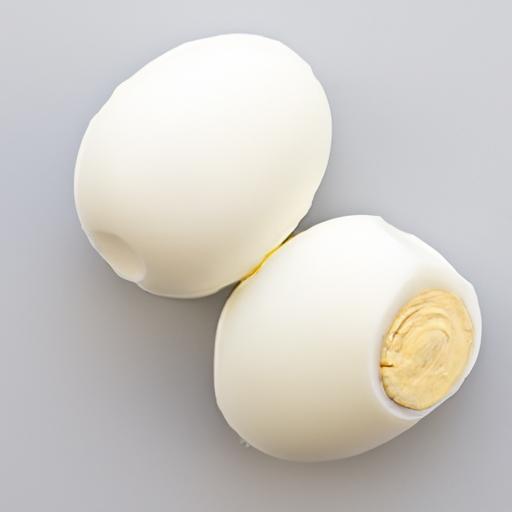
- Peeling tip: Roll the egg gently to create micro-fractures all around before peeling to maintain smooth, intact whites.
- Storage tip: Keep peeled eggs submerged in water with a damp towel cover in the fridge to retain moisture for up to two days.
Creative Uses and Presentation Tips to Elevate Your Perfect Hard-Boiled Eggs
Unleash the versatility of your perfectly cooked eggs:
- Colorful Deviled Eggs: Elevate the classic by mixing yolks with avocado, smoked paprika, or beet juice for vibrant colors.
- Elegant Salad Toppings: Slice eggs thinly and layer atop fresh greens with edible flowers, microgreens, and a light vinaigrette.
- Breakfast Bowls: Halve the eggs and nestle them into grain bowls with quinoa, roasted veggies, and tahini sauce for a balanced brunch.
- Minimalist Snack Platter: Sprinkle cut eggs with flaky sea salt, cracked pepper, and a drizzle of truffle oil, paired with artisan breads.
- Asian-Inspired: Marinate peeled eggs briefly in soy sauce,mirin,and sesame oil for a savory umami boost-perfect for ramen or snacks.
Nutritional Data per Egg
| Calories | Protein (g) | Carbs (g) | Fat (g) |
|---|---|---|---|
| 78 | 6.3 | 0.6 | 5.3 |
For more tips on egg-based dishes, explore our article on Perfect Egg Salad Recipe. You can also visit Serious Eats’ guide on hard-boiled eggs for complete science-backed advice.

Q&A
Q&A: The Science and Art of Perfect Hard-Boiled Eggs Every Time
Q1: Why can hard-boiled eggs sometimes turn out with a green ring around the yolk?
A1: That greenish-gray halo is actually a chemical reaction! When eggs are overcooked or cooled too slowly, sulfur from the white reacts with iron in the yolk, forming iron sulfide. While it looks unappetizing, it’s harmless – just a sign you’ve taken your cooking a tad too far.
Q2: What’s the perfect timing for boiling eggs to get a firm, yet creamy yolk?
A2: Timing is everything! Generally, a 9 to 12-minute boil after the water reaches a rolling boil gives you a fully set yet tender yolk. Less than 9 minutes might leave a slightly runny center; more than 12 minutes pulls you toward that dreaded green ring territory.Q3: Does the freshness of the egg affect how easy it is to peel?
A3: Absolutely. Surprisingly, older eggs peel easier once cooked. fresh eggs have tighter membranes sticking closely to the shell, making them more stubborn. Letting eggs age a week or two - or buying eggs from the store, which are usually older – can save you peeling headaches.
Q4: Is starting eggs in hot water better than cold water?
A4: Both methods have merits. Starting in cold water and bringing it to a boil gently cooks the egg, minimizing cracking but lengthening cooking time. Starting with eggs in boiling water speeds up cooking and often results in easier peeling, yet requires careful timing to avoid overcooking.
Q5: How can I make peeling hard-boiled eggs quicker and cleaner?
A5: A little science hack: shock your boiled eggs in an ice water bath immediately after cooking. This cools the egg rapidly,contracts the white from the shell,and helps separate membrane bonds. Gently cracking the shell all over and peeling under running water also works wonders.
Q6: Are some egg sizes or types better suited for hard boiling?
A6: The size influences timing – bigger eggs need a bit longer, smaller ones less. As for types, farm-fresh or pasture-raised eggs don’t differ much in boil behavior, but color (white vs. brown) is purely cosmetic and won’t change your results.
Q7: Can seasoning be added before boiling to enhance flavor?
A7: While salt or vinegar can be added to the water, it mainly helps prevent whites from leaking if shells crack during cooking. Seasoning the eggs is best done after peeling to preserve the pure, classic taste of that perfect hard-boiled egg.
Q8: What’s the secret to consistently perfect hard-boiled eggs every time?
A8: Consistency comes from controlled temperature, precise timing, and gentle cooling. Use a reliable timer, avoid overcrowding your pot, promptly cool in ice water, and practice. with each attempt, you’ll tune into the subtle dance between science and art that yields egg-cellence!
Unlock your egg potential and let each boil sing - as mastering hard-boiled eggs is both an experiment and an edible masterpiece.
key Takeaways
Mastering the perfect hard-boiled egg is both a science and an art-a delicate balance of temperature, timing, and technique. With each carefully timed boil and thoughtful peel, you transform a humble egg into a canvas of texture and flavor, ready to elevate any meal. Whether you’re crafting a simple snack, a protein-packed addition to your salad, or a canvas for your culinary creativity, these tips ensure success every time. So next time you boil a batch, remember: it’s not just about cooking an egg-it’s about unlocking the magic within its shell, one perfectly cooked bite at a time.